
Give some style with Tailwind

Updated version for Laravel 10 / Twill 3 on Apr 14, 2023
Installation and configuration
For these steps, we will mainly follow the official documentation.
Dependencies installation
# Tailwind and its dependencies: PostCSS, Autoprefixer
yarn add tailwindcss postcss autoprefixer --dev
Configuration files generation
Let's generate tailwind.config.js and postcss.config.js files in our project root folder with the default configuration. That can be done manually or with the following command:
npx tailwindcss init -p
PostCSS configuration
Here we keep the default configuration.
/postcss.config.js
module.exports = {
  plugins: {
    tailwindcss: {},
    autoprefixer: {},
  },
}
Tailwind Configuration
From the default configuration, we add the paths (relative to the project root) to all of our files that can contain Tailwind class names (Blade templates, Vue components, ...)
/tailwind.config.js
/** @type {import('tailwindcss').Config} */
module.exports = {
  content: [
    './resources/**/*.blade.php',
    './resources/**/*.vue',
  ],
  theme: {
    extend: {},
  },
  plugins: [],
}
Integration in our application
Create a CSS file with Tailwind directives
Import it into our application
Use it in our root view
We can use the default /resources/css/app.css that comes with Laravel (or feel free to do as you want) and we add the standard Tailwind directives.
/resources/css/app.css
@tailwind base;
@tailwind components;
@tailwind utilities;
Then we import it into our TypeScript application file.
/resources/js/app.ts
import { createApp, h, type DefineComponent } from 'vue'
import { createInertiaApp } from '@inertiajs/vue3'
import { resolvePageComponent } from 'laravel-vite-plugin/inertia-helpers'

import '../css/app.css'

createInertiaApp({
...
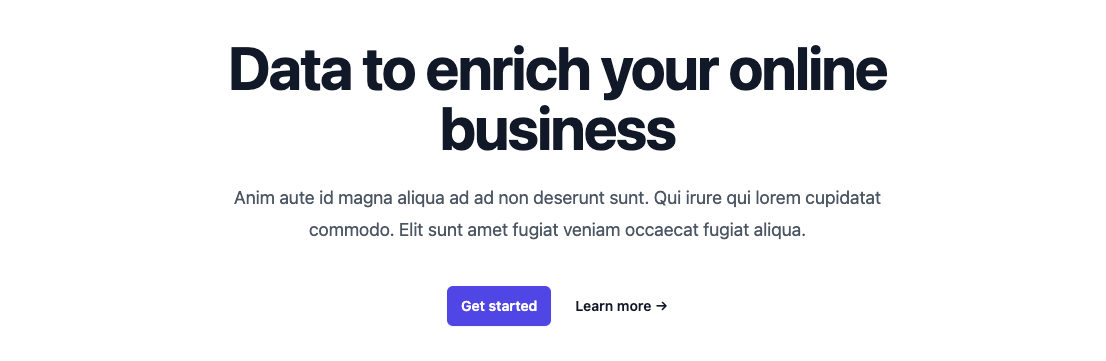
Time to play
Just to see if it works
To do so, we will use a simple component taken from Tailwind UI, and we replace the template part of our Index Page with this:
/resources/js/Pages/Index.vue
<template>
  <div class="bg-white">
    <div class="relative isolate px-6 pt-14 lg:px-8">
      <div class="mx-auto max-w-2xl py-32 sm:py-48 lg:py-56">
        <div class="text-center">
          <h1 class="text-4xl font-bold tracking-tight text-gray-900 sm:text-6xl">Data to enrich your online business</h1>
          <p class="mt-6 text-lg leading-8 text-gray-600">Anim aute id magna aliqua ad ad non deserunt sunt. Qui irure qui lorem cupidatat commodo. Elit sunt amet fugiat veniam occaecat fugiat aliqua.</p>
          <div class="mt-10 flex items-center justify-center gap-x-6">
            <a href="#" class="rounded-md bg-indigo-600 px-3.5 py-2.5 text-sm font-semibold text-white shadow-sm hover:bg-indigo-500 focus-visible:outline focus-visible:outline-2 focus-visible:outline-offset-2 focus-visible:outline-indigo-600">Get started</a>
            <a href="#" class="text-sm font-semibold leading-6 text-gray-900">Learn more <span aria-hidden="true">→</span></a>
          </div>
        </div>
      </div>
    </div>
  </div>
</template>
If Vite is started you just have to save and have a look at your browser to see
Why not add some logic to play around
At this time we have a static Vue application, maybe we could use some data from our Laravel Controller and play with CSS classes.
In our Laravel Controller, we will compute a darkMode random boolean that we will use on our Page.
The Inertia render function takes a second parameter which is an associative array that will be passed as Vue props in the Page.
/app/Http/Controllers/IndexController.php
<?php

namespace App\Http\Controllers;

use Inertia\Inertia;
use Inertia\Response as InertiaResponse;

class IndexController extends Controller
{
    public function __invoke(): InertiaResponse
    {
        return Inertia::render('Index', [
            'darkMode' => (bool)random_int(0, 1),
        ]);
    }
}
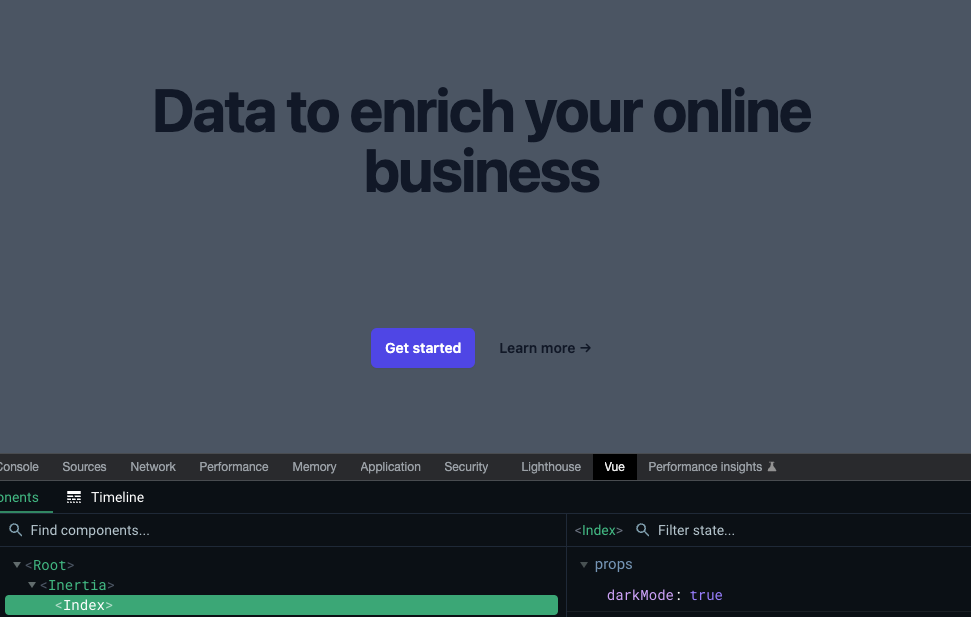
And now on our Page, we register our darkMode prop (as a Boolean) in our component props and use it in the first div of the template to alternatively set its class to bg-gray-600 or bg-white.
/resources/views/Pages/Index.vue
<script setup lang="ts">
interface Props {
  darkMode: boolean
}

const props = defineProps<Props>()
</script>

<template>
  <div :class="darkMode ? 'bg-gray-600' : 'bg-white'">
    <div class="relative isolate px-6 pt-14 lg:px-8">
      <div class="mx-auto max-w-2xl py-32 sm:py-48 lg:py-56">
        <div class="text-center">
          <h1 class="text-4xl font-bold tracking-tight text-gray-900 sm:text-6xl">Data to enrich your online business</h1>
          <p class="mt-6 text-lg leading-8 text-gray-600">Anim aute id magna aliqua ad ad non deserunt sunt. Qui irure qui lorem cupidatat commodo. Elit sunt amet fugiat veniam occaecat fugiat aliqua.</p>
          <div class="mt-10 flex items-center justify-center gap-x-6">
            <a href="#" class="rounded-md bg-indigo-600 px-3.5 py-2.5 text-sm font-semibold text-white shadow-sm hover:bg-indigo-500 focus-visible:outline focus-visible:outline-2 focus-visible:outline-offset-2 focus-visible:outline-indigo-600">Get started</a>
            <a href="#" class="text-sm font-semibold leading-6 text-gray-900">Learn more <span aria-hidden="true">→</span></a>
          </div>
        </div>
      </div>
    </div>
  </div>
</template>
If we go back to our browser, we can now either see this
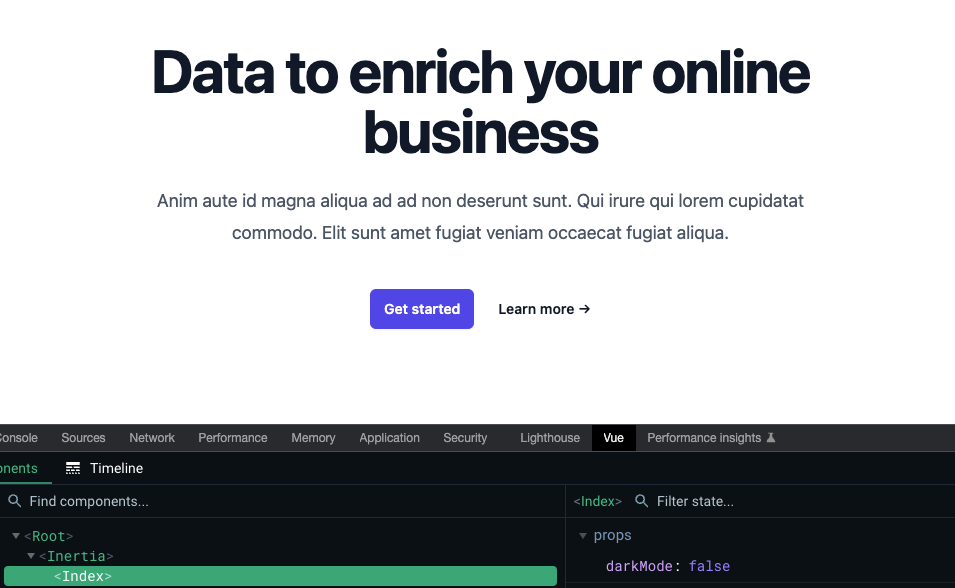
or this
All is now set to build the front-end of our application, in the next article we will prepare the back-end
We'll do our best to provide source code of the serie on GitHub